Blog May 19, 2019
Getting Started with Augmented Faces with ARCore


Getting Started With Augmented Faces with ARCore
Introduction
Recently, Google introduced Augmented Faces as a part of ARCore. With this announcement, developers can more easily add Augmented Reality experiences overtop user's faces via their devices camera. This post will give you a technical understanding of how Augmented Faces within ARCore works and show you how to get started today in your own application.
How it Works
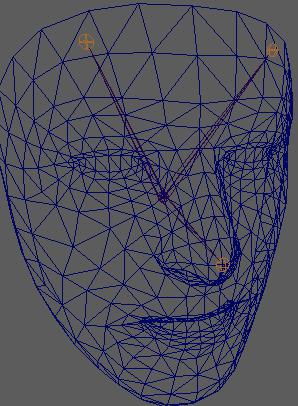
Augmented Faces allows your AR experience to automatically identify regions of a detected face. Augmented Faces then uses those regions to overlay textures and/or 2D/3D content that matches those identified regions.
ARCore does this by identifiying the center pose of the users face or the physical center point of the detected head inside the skull. Then it finds the a face mesh, which consists of vertices that make up the user's face and are all relative on the center pose.
Sample App
This blog includes a sample application that detects a user's face, adds a texture (freckles and blush) to the face regions, and positions a 2D lightbulb above the user's head.
Project Setup
To get started, first ensure you add the Sceneform dependency to your application.
implementation 'com.google.ar.sceneform.ux:sceneform-ux:1.9.0'
In your manifest file, add the Camera Permission and set AR feature as required.
<uses-permission android:name="android.permission.CAMERA"/>
<uses-feature android:name="android.hardware.camera.ar" android:required="true"/>
ARCore uses an ArFragment that provides a lot of out of the box features such as permission handling, plane finding, and camera set up. You can use the fragment directly in your activity, but whenever you need custom features such as Augmented Faces, you will need to extend the ArFragment and set the appropriate settings.
Augmented Faces only works on the front facing camera, so we need to first start by requesting ARCore to use the front facing camera.
override fun getSessionFeatures(): Set<Session.Feature> {
 return EnumSet.of<Session.Feature>(Session.Feature.FRONT_CAMERA)
}
Next we need to let ARCore know that we intend to use Augmented Faces so it can begin its face detecting.
override fun getSessionConfiguration(session: Session): Config {
 val config = Config(session)
 config.augmentedFaceMode = Config.AugmentedFaceMode.MESH3D
 return config
}
To further benefit our experience we need to let ARCore know that we don't care about plane detection or the UI that goes along with it.
override fun onCreateView(inflater: LayoutInflater, container: ViewGroup?, savedInstanceState: Bundle?): View {
 val fragmentView = super.onCreateView(inflater, container, savedInstanceState)
 //hide some of the plane finders and discovery since its not needed for augmented images.
 planeDiscoveryController.hide()
 planeDiscoveryController.setInstructionView(null)
 return fragmentView!!
}
Detecting Faces
ARCore takes all the face detection work out of the way and lets you just focus on the experience you are trying to build for your user. To begin detecting faces and adding experiences, simply begin by adding a frame update listener to your scene in your activity.
scene.addOnUpdateListener {
 //get all the faces in the frame
 val faceList = sceneView.session!!.getAllTrackables(AugmentedFace::class.java)
 for (face in faceList) {
 //do something with the face
 }
}
The above code is hit on every new frame and simply allows you to check for the faces that are in the frame so that you can add an augmented experience. In order to Augment the found face(s), you need to create AugmentedFaceNodes, which is just a type of Node that uses the CenterPose of the found face as the Anchor. Then just add the node to the current scene.
val faceNode = AugmentedFaceNode(face)
faceNode.setParent(scene)
Renderables & Textures
Within ARCore, any UI element that you want to show as an Augmented experience is known as a Renderable. Renderables can be common Android Widgets or 3D Models. For our simple use case, we are using a ViewRenderable to show an ImageView above the user's head. The same method can be used to render an actual 3D image if you choose to do so.
ViewRenderable.builder().setView(this, R.layout.idea_view).build()
 .thenAccept {
 val lightBulb = Node()
 val localPosition = Vector3()
 //lift the light bulb to be just above your head.
 localPosition.set(0.0f, 0.17f, 0.0f)
 lightBulb.localPosition = localPosition
 lightBulb.setParent(faceNode)
 lightBulb.renderable = it
}//give the face a little blush
Texture.builder()
.setSource(this, R.drawable.blush_texture)
.build()
.thenAccept { texture ->
faceNode.faceMeshTexture = texture
}Limitations & Bugs
While the code included with this blog post attempts to detect multiple faces, ARCore only returned one face per frame at the time of writing. You can follow this bug here. By leaving this code as is, once this bug is fixed the app should automatically start supporting multiple faces per frame.
Closing
As you can see, creating facial AR experiences within your application is more attainable today than ever before. With the release of Augmented Faces, Google continues to knock down the barriers of complex Computer Science problems to empower developers to focus on their use cases.
Authors
Clinton Teegarden is the Mobile & Devices Lead & Engineer at CapTech. I specialize in delivering products for Fortune 500 clients in Mobile, Android Architecture, & IoT.Dylan Doggett is software engineer at CapTech based in Phoenix, Arizona. He specializes in Android development and has worked on several banking and eCommerce applications.

